Yesterday's Art
Since Walmart is selling school supplies dirt cheap right now, I've been stocking up on 20cent boxes of crayons, 20cent packages of stick glue and 50cent memo books. Then I saw an article in an art magazine about spiffing up said memo books and figured, "sure! Why not?".
So Bella and I sat down with paper and glue and some cutting tools and set to work decorating our books!
She picked out the papers for hers, and smooshed them on (after i applied the glue) and stamped her name on the cover. Then in a moment of creative inspiration, she noticed a label I was taking off a roll of tape and asked if she could have it. Then she glued it on the cover of her book (the round label at the bottom). Then she went upstairs to her craft box, pulled out some red glitter and set about to put stripes of paste on her book and the sprinkled on the glitter.
I was so proud of her at that moment!


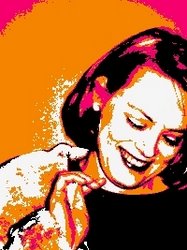
I also tried my hand at creating a face stencil. I was browsing blogs of mixed media artists and just fell in love with the photos on this one:
http://ramblingrose.typepad.com/
She had a link to information on creating your own face stencils (although for some reason I can't seem to find the link. Arrggghhhh). I somewhat followed the instructions. Basically, you open a photo in photoshop. Change it to a notebook sketch and then change it to black and white resolution. Then you print it out on a surface you can cut. I used a transparency but you could use cardstock or something heavy like that. The downside is, choosing a photo tht will work with this is harder than it might seem because you want to be able to link up the cuts with the outside shape and or cut details in the middle without the whole thing falling apart. I may not be explaining it well but if you give it a try, you'll see what I mean.
There is some trial and error involved and the cutting (I used a craft knife with a new, nice, sharp blade). I printed out about eight different pictures on transparencies in different sizes but found that the two stencils I created below were the only ones that were really going to work.
In spite of the hand cramping from the cutting and the ink I managed to smear on myself, the table and all papers within the immediate vicinity, I was pretty pleased with the result. I inked the stencil images onto a page from a vintage house beautiful magazine (the largest one), a page from a vintage novel and an old piece of stationary I found laying around on my craft desk. What do you think? Am I the most narcissistic person EVER? LOL
I think next I want to try creating a floral stencil or one of a child's face like I saw on the blog I noted above. If I find the link with the directions, I'll add it in here.


HA! I FOUND IT!! THE DIRECTIONS FOR CREATING THE STENCIL. HERE IT IS:
http://littleblackkitty.typepad.com/a_little_imagination_and_/2007/06/tutorial_selfpo.html
posted by BohemianD @ Friday, August 10, 2007
2 Comments
![]()
![]()

2 Comments:
Very impressive! Daughter like Mother!
Love you all, Mom
Very intersting article about the lady bugs! Those beetles don't look anything like your stinky old lady bugs! You must need more birds around your house.
Love You, Mom
Post a Comment
Subscribe to Post Comments [Atom]
<< Home